Some people (such as your author) are happy with using a powerful text editor (such as Vim or Emacs) and a terminal to do their application development. But others are sometimes more comfortable with an integrated development environment (IDE). So in this section, we’ll see how to set up Qt Creator to write, build, deploy and debug a Qt5 application.
Installing and running Qt Creator
Qt Creator has already been installed on the CE Servers zaphod and eda1. If you wish to install Qt Creator on your own Linux system proceed as follow:
On Debian/Ubuntu systems:
$ sudo apt install qtcreator
The following instructions have been written and tested against Qt Creator version 4.14.1.
Start qtcreator from the shell by typing
gosper@zaphod:~$ qtcreator
Creating a kit
After starting Qt Creator, the first thing to do is to create a kit, which describes the cross-compiler and Qt installation provided by Buildroot. Go to Tools -> Options, and the first item should be Kits:
Click on Add, and fill in the different fields as follows:
- Name:
Buildroot ARM - Device type:
Generic Linux Device - Sysroot:
/path/to/buildroot/output/host/arm-buildroot-linux-gnueabihf/sysroot/. Of course, replace/path/to/buildroot/with the appropriate path on your system. - For the compiler, click on Manage, then in the Compiler panel:
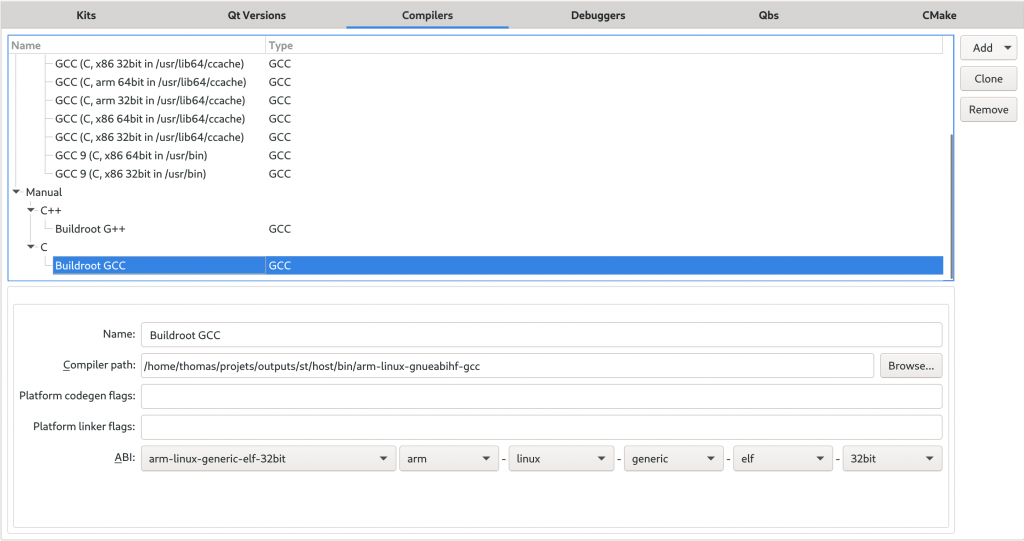
- Add one GCC C compiler, with the name
Buildroot GCCand pointing to/path/to/buildroot/output/host/bin/arm-linux-gnueabihf-gcc - Add one GCC C++ compiler, with the name
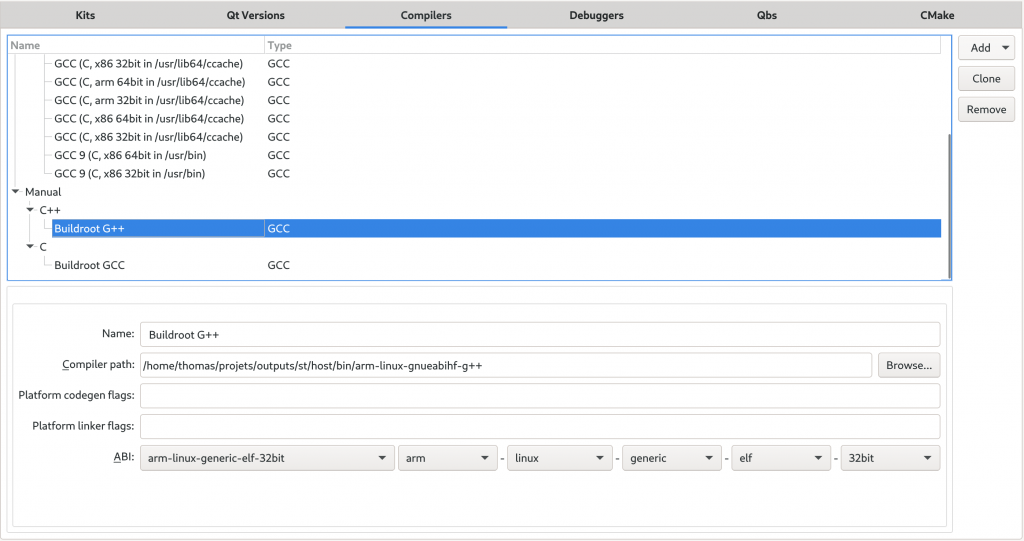
Buildroot G++and pointing to/path/to/buildroot/output/host/bin/arm-linux-gnueabihf-g++
- Add one GCC C compiler, with the name
- Back in the Kits panel, select Buildroot GCC and Buildroot G++ as the C and C++ compilers, respectively.
- For the debugger, click on Manage, then in the debugger panel add one debugger named
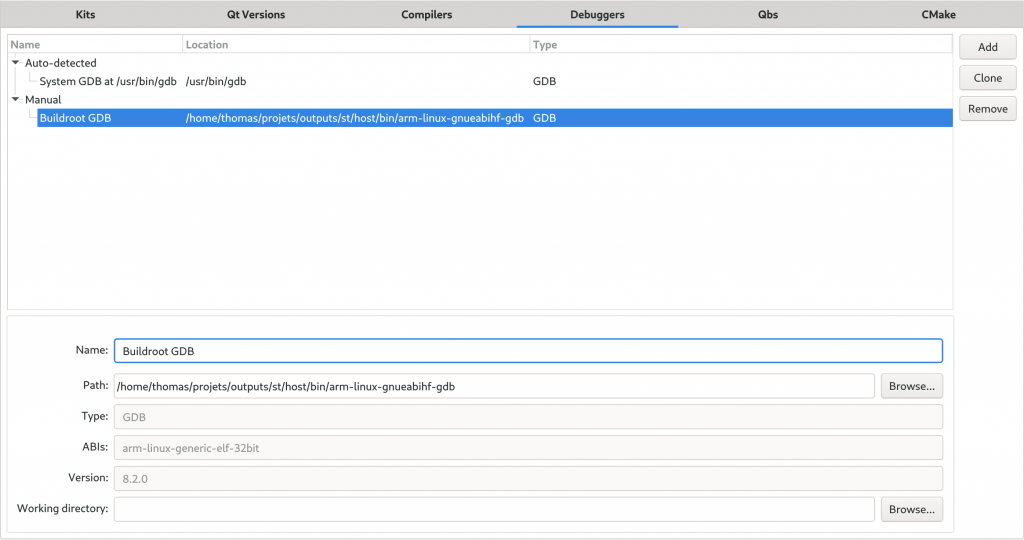
Buildroot GDB, and pointing to/path/to/buildroot/output/host/bin/arm-linux-gnueabihf-gdb. Back in the Kits panel, select Buildroot GDB as our debugger. - For the Qt version, click on Manage, then on Add, and point to the
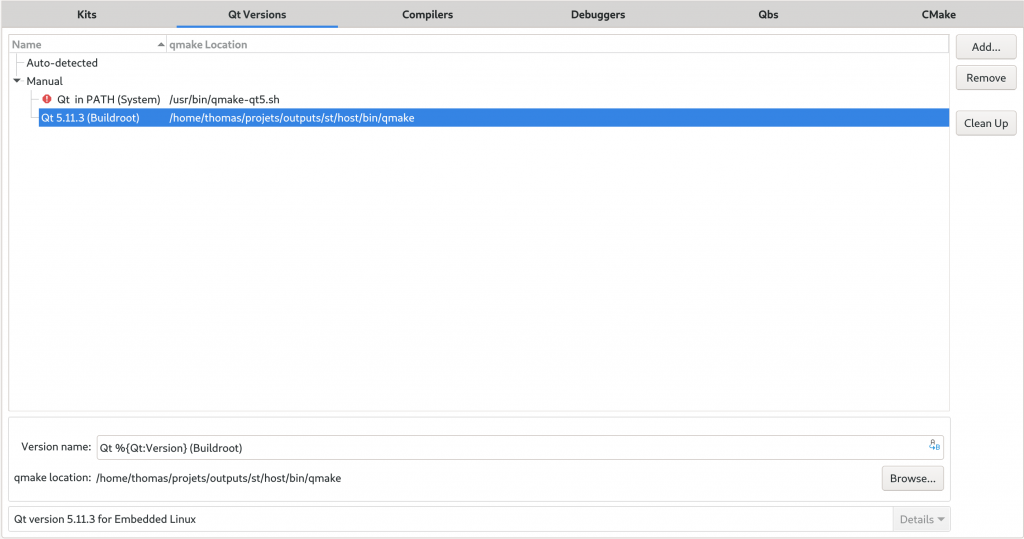
qmakebinary in/path/to/buildroot/output/host/bin/. It will auto-detect that Buildroot has built Qt 5.11.3. You may want to adjust the version name fromQt %{Qt:Version} (host)toQt %{Qt:Version} (Buildroot), as this Qt version is clearly not built for our host PC. Then back in the Kits panel, select this new Qt version. - For the Qt mkspec, enter
devices/linux-buildroot-g++, which is the name of the mkspec configuration Buildroot generates.
You’ll find below screenshots of the various panels, with the details related to the Buildroot cross-compiler, cross-debugger and Qt installation:
Qt Creator Kits panel, filled in with the details of the Buildroot cross-compiler, cross-debugger and Qt installation
Qt Creator compiler panel, filled in with the details of the Buildroot C compiler
Qt Creator compiler panel, filled in with the details of the Buildroot C++ compiler
Qt Creator debugger panel, filled in with the details of the Buildroot cross-debugger
Qt Creator Qt version panel, filled in with the details of the Buildroot Qt installation
We’re now done configuring a Kit!
Creating a device
In order to allow Qt Creator to deploy our application to the device, run it and debug it, we need to create a Device. Go again in Tools -> Options, and this time go to the Devices panel.
In the first window, select Generic Linux Device.
Then, for the device name, use STM32MP15 Discovery board for example, for the IP address, either the DNS name of your board ("data") or the corresponding IP address 172.16.3.139 and for the user, root, which should give:
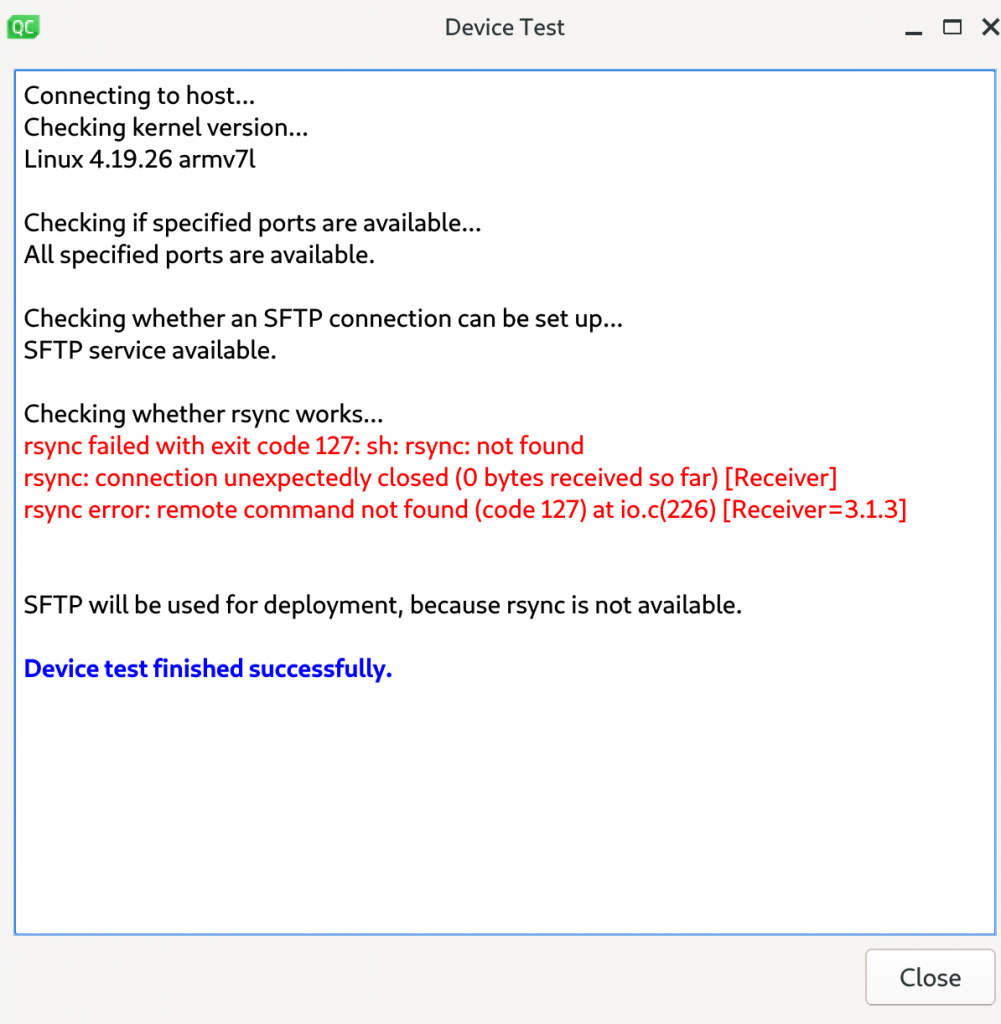
In the next step about Key deployment, simply skip to the next section, as we have not created a private/public key pair, as explained previously in this blog post. You can then finalize the device creation. Qt Creator will now test that it can communicate as expected with our device:
As you can see, it doesn’t find rsync on the target, because we have not installed it. It will use sftp instead, which is fine.
Back in the Device panel, you should see our device definition as follows:
Qt Creator device panel, filled in with the details of our STM32MP15 Discovery board
You can click on Open Remote Shell to directly open a shell over SSH to your target, or Show Running processes.
Our device is now set up correctly, time to create our first application!
Importing our project
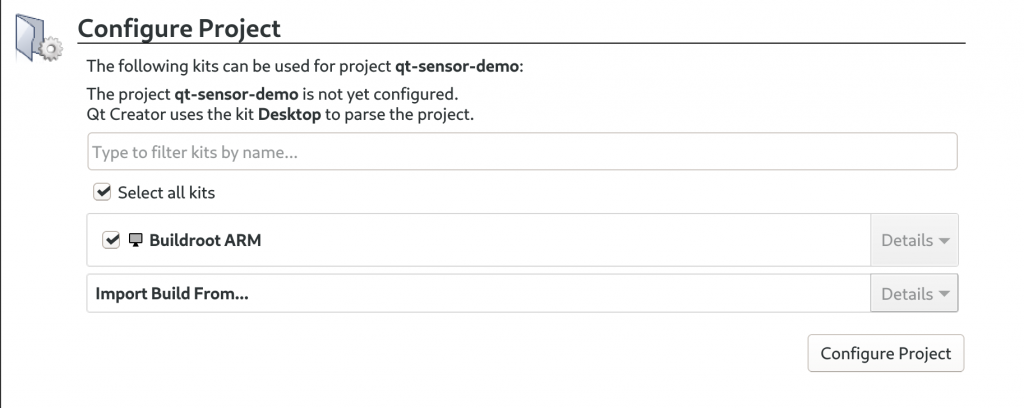
We now want to import our qt-sensor-demo project in Qt Creator. To do so, go in File -> Open File or Project, then browse to the directory containing our qt-sensor-demo application, and select both the main.cppand qt-sensor-demo.pro files, and click Open. Qt Creator should now switch to a Configure project window, where it asks you to select the Kit to use for this project. Obviously, select the Buildroot ARM kit we have just created, and validate by clicking Configure Project:
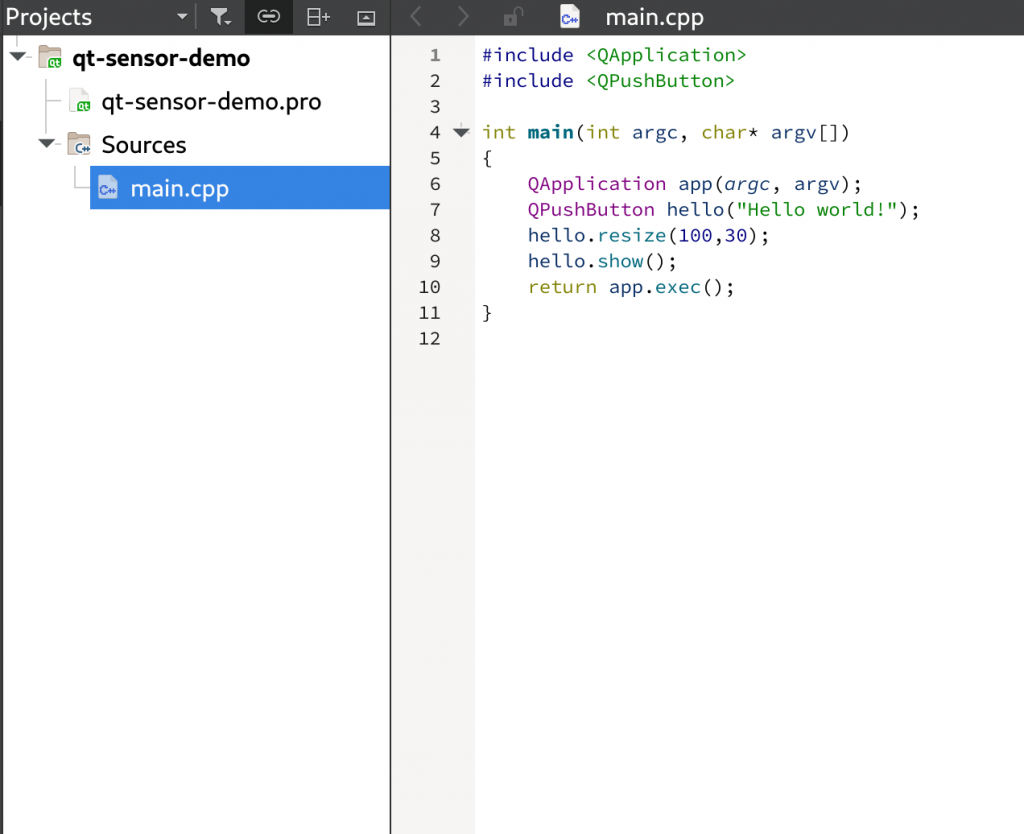
You should now see our project imported, with both of its files, and main.cpp is opened by default:
If we now use Build -> Build All, and then go in the Compile Output panel, we see:
13:11:58: Running steps for project qt-sensor-demo...
13:11:59: Starting: "/home/thomas/projets/outputs/st/host/bin/qmake" /home/thomas/qt-sensor-demo/qt-sensor-demo.pro -spec devices/linux-buildroot-g++ CONFIG+=debug CONFIG+=qml_debug
Info: creating stash file /home/thomas/build-qt-sensor-demo-Buildroot_ARM-Debug/.qmake.stash
13:11:59: The process "/home/thomas/projets/outputs/st/host/bin/qmake" exited normally.
13:11:59: Starting: "/usr/bin/make" -f /home/thomas/build-qt-sensor-demo-Buildroot_ARM-Debug/Makefile qmake_all
make: Nothing to be done for 'qmake_all'.
13:11:59: The process "/usr/bin/make" exited normally.
13:11:59: Starting: "/usr/bin/make" -j4
/home/thomas/projets/outputs/st/host/bin/arm-linux-gnueabihf-g++ -c -pipe -D_LARGEFILE_SOURCE -D_LARGEFILE64_SOURCE -D_FILE_OFFSET_BITS=64 -Os -Og --sysroot=/home/thomas/projets/outputs/st/host/arm-buildroot-linux-gnueabihf/sysroot -g -Wall -W -D_REENTRANT -fPIC -DQT_QML_DEBUG -DQT_WIDGETS_LIB -DQT_GUI_LIB -DQT_CORE_LIB -I../qt-sensor-demo -I. -I../projets/outputs/st/host/arm-buildroot-linux-gnueabihf/sysroot/usr/include/qt5 -I../projets/outputs/st/host/arm-buildroot-linux-gnueabihf/sysroot/usr/include/qt5/QtWidgets -I../projets/outputs/st/host/arm-buildroot-linux-gnueabihf/sysroot/usr/include/qt5/QtGui -I../projets/outputs/st/host/arm-buildroot-linux-gnueabihf/sysroot/usr/include/qt5/QtCore -I. -I../projets/outputs/st/host/mkspecs/devices/linux-buildroot-g++ -o main.o ../qt-sensor-demo/main.cpp
/home/thomas/projets/outputs/st/host/bin/arm-linux-gnueabihf-g++ --sysroot=/home/thomas/projets/outputs/st/host/arm-buildroot-linux-gnueabihf/sysroot -o qt-sensor-demo main.o   -lQt5Widgets -lQt5Gui -lQt5Core -lrt -ldl -latomic -lpthread
13:12:00: The process "/usr/bin/make" exited normally.
13:12:00: Elapsed time: 00:02.
So we see that it is invoking qmake from Buildroot, and then running make, which builds our application, with the appropriate cross-compiler provided by Buildroot!
The application has been built in /home/thomas/build-qt-sensor-demo-Buildroot_ARM-Debug, which contains:
-rw-rw-r-- 1 thomas thomas 620760 30 août  13:12 main.o
-rw-rw-r-- 1 thomas thomas  31522 30 août  13:11 Makefile
-rwxrwxr-x 1 thomas thomas 516504 30 août  13:12 qt-sensor-demo
Running the application on the target
In order for Qt to deploy our application on the target, we need to adjust our .pro file so that it has directives to install the application. We’ll simply make our .pro file look like this:
QT += widgets
SOURCES = main.cpp
INSTALLS += target
target.path = /usr/bin
We invite you to read the relevant part of the Qt documentation to get details about the INSTALLS directive and the special target keyword.
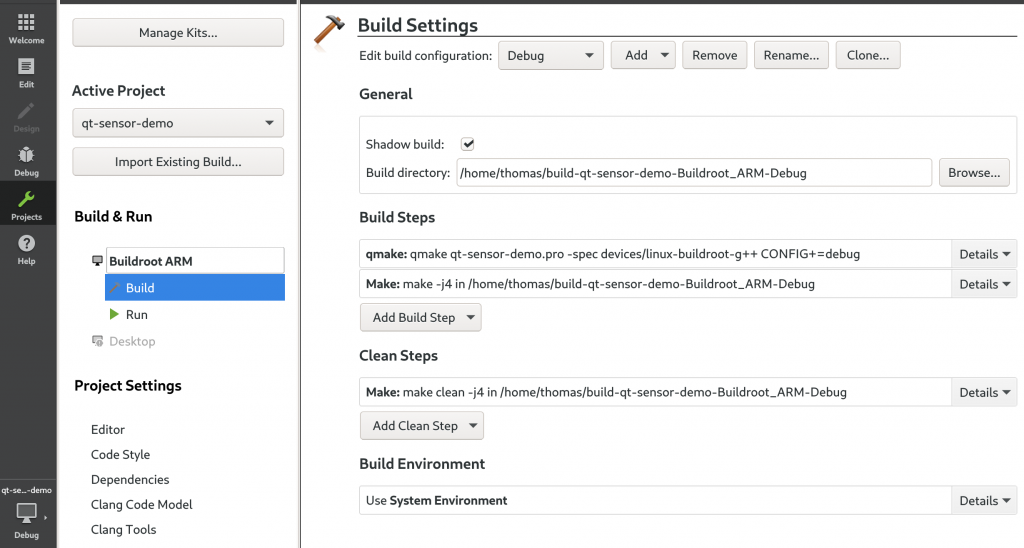
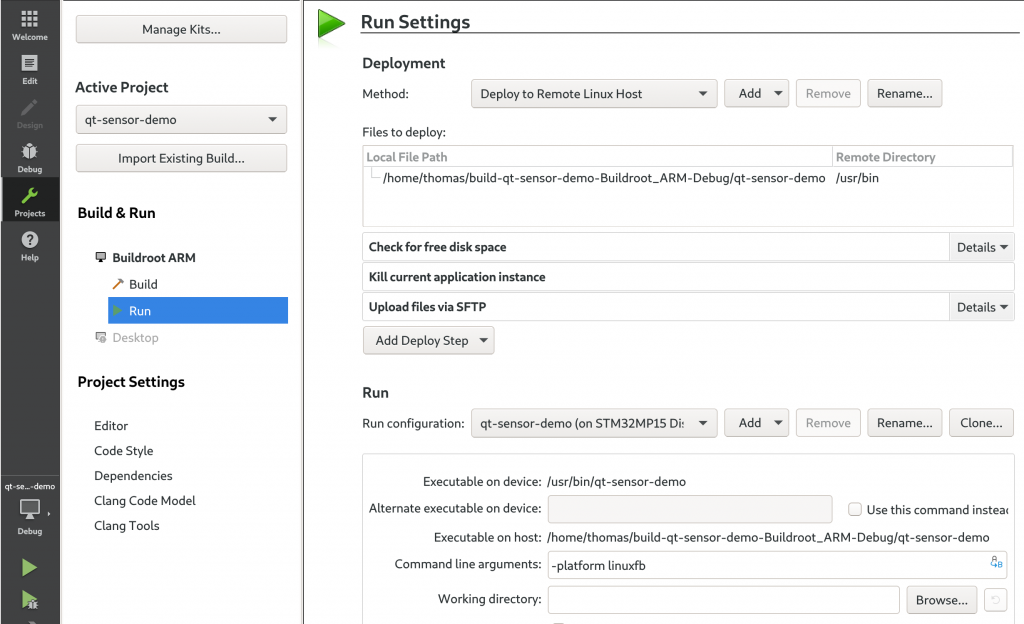
Before we can really deploy on your target, we need to adjust the Run configuration, so click on the Project icon in the left bar, which should bring you to:
We’re seeing the Build settings, so click on Run to see the Run settings. Everything should already be auto-detected: we want to deploy qt-sensor-demo to /usr/bin on the target, the target is STM32MP15 Discovery board. The only thing we need to change is to set Command line arguments to -platform linuxfb. Your settings should then look like this:
Now, you can finally do Build -> Run. Qt Creator will prompt you for the root password of your target, and automatically deploy and run the application!
Just to test it, make a change to the QPushButton label, and do Build -> Run again. You’ll see the new version of your application running!


