Setting up GDB
The last part in setting up our development environment is to be able to debug our application from Qt Creator. This involves remote debugging, where the debugger runs on your workstation, while the program being debugged runs on a separate target. As part of the Kit definition done previously, we have already told Qt Creator where the cross debuggerprovided by Buildroot is.
Now, we need to have gdbserver on the target, which is the program with which the cross-debugger will communicate to control the execution of our application on the target. To achieve this, go to the Buildroot menuconfig, and enable the option BR2_TOOLCHAIN_EXTERNAL_GDB_SERVER_COPY, in Toolchain -> Copy gdb server to the Target. With this done, we now need to have Buildroot take this change into account. Unfortunately simply running make will not take this change into account (see here for more details). We could do a full clean rebuild of Buildroot (make clean all), but that would take quite some time, so we’ll ask Buildroot to only reinstall the toolchain package and regenerate the root filesystem image:
make toolchain-external-arm-arm-reinstall all
Reflash your SD card, and reboot the system. You should now have gdbserver available on the target:
# ls -l /usr/bin/gdbserver
-rwxr-xr-x    1 root     root        355924 Aug 29  2019 /usr/bin/gdbserver
We’ll now change a bit our program with some additional dummy code to play around with the debugger:
#include <QApplication>
#include <QPushButton>

int main(int argc, char* argv[])
{
    int a = 42;
    QApplication app(argc, argv);
    QPushButton hello("Hello world!");
    a++;
    qDebug("Test 1");
    a++;
    qDebug("Test 2");
    hello.resize(100,30);
    hello.show();
    return app.exec();
}
Place a breakpoint on the line QApplication app(argc, argv) by clicking to the left of this line, it should show a red dot, like this:
Then you can start debugging by clicking on the following button in the left bar:
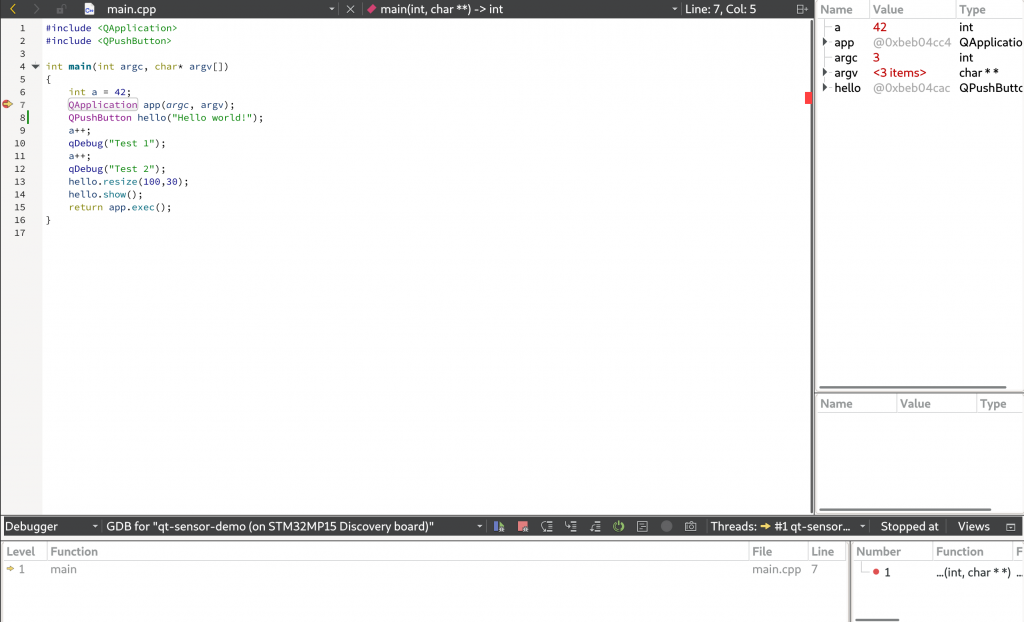
It will switch to the debug view, with the program stopped at our breakpoint:
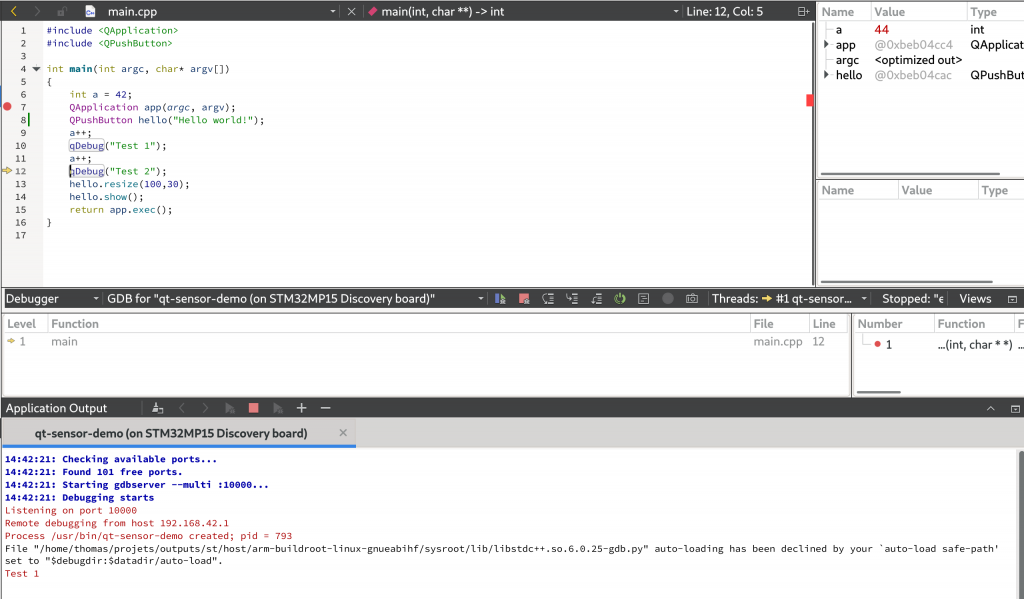
At the bottom of the screen, click on Application Output so that we can see the stdout of the application running on the target. Now hit F10 to step through our code line by line. You should then see the value of the variable a updated in the top right panel, and the Test 1 and then Test 2messages printed in the application output:
So, as expected, we are able to debug our application! This concludes the setup of Qt Creator, which allows us to very easily make a change to our application, build it, deploy it on the target and debug it.
Starting the application automatically at boot time
The next and almost final step for this blog post is to get our application automatically started at boot time. We can simply add a small shell script on the target in /etc/init.d/: the default Buildroot configuration for the init system will execute all scripts named Ssomething in /etc/init.d/. We'll add a file named package/qt-sensor-demo/S99qt-sensor-demo with these contents:
#!/bin/sh

DAEMON="qt-sensor-demo"
DAEMON_ARGS="-platform linuxfb"
PIDFILE="/var/run/qt-sensor-demo.pid"

start() {
	printf 'Starting %s: ' "$DAEMON"
	start-stop-daemon -b -m -S -q -p "$PIDFILE" -x "/usr/bin/$DAEMON" -- $DAEMON_ARGS
	status=$?
	if [ "$status" -eq 0 ]; then
		echo "OK"
	else
		echo "FAIL"
	fi
	return "$status"
}

stop () {
	printf 'Stopping %s: ' "$DAEMON"
	start-stop-daemon -K -q -p "$PIDFILE"
	status=$?
	if [ "$status" -eq 0 ]; then
		rm -f "$PIDFILE"
		echo "OK"
	else
		echo "FAIL"
	fi
	return "$status"
}

restart () {
	stop
	sleep 1
	start
}

case "$1" in
        start|stop|restart)
		"$1";;
	reload)
		# Restart, since there is no true "reload" feature.
		restart;;
        *)
                echo "Usage: $0 {start|stop|restart|reload}"
                exit 1
esac
This is the canonical init script used in Buildroot to start system daemons and services, and is modeled after the one in package/busybox/S01syslogd. It uses the start-stop-daemon program to start our application in the background.
Then, to get this init script installed, we need to adjust package/qt-sensor-demo/qt-sensor-demo.mk with the following additional lines:
define QT_SENSOR_DEMO_INSTALL_INIT_SYSV
        $(INSTALL) -D -m 755 package/qt-sensor-demo/S99qt-sensor-demo \
                $(TARGET_DIR)/etc/init.d/S99qt-sensor-demo
endef
This ensures that the init script gets installed in /etc/init.d/S99qt-sensor-demo as part of the build process of our qt-sensor-demo package. Note that an init script works fine if you're using the Busybox init implementation or the sysvinit init implementation (we're using the default Buildroot setup here, which uses the Busybox init implementation). If you want to use systemd as an init implementation, then a different setup is necessary.
With this done, you simply need to reinstall the application and regenerate the SD card image
$ make qt-sensor-demo-reinstall
$ make
You can now test your SD card image on you board, and you should see the application being started automatically, with the following messages at boot time
Starting dropbear sshd: OK
Starting qt-sensor-demo: OK

Welcome to Buildroot
Avoid unnecessary logging on the display panel
In our current setup, the kernel messages are being sent to both the serial port and the framebuffer console, which means they appear on the display panel. This is not very pretty, and we would like the display to remain black until the application starts, while keeping the kernel messages on the serial port for debugging purposes. Also, we would like the framebuffer console text cursor to not be displayed, to really have a fully black screen. To achieve this we will add two arguments on the Linux kernel command line:
console=ttySTM0,115200, which will tell the Linux kernel to only use the serial port as the console, and not all registered consoles, which would include the framebuffer console. This option will make sure the kernel messages are not displayed on the screen.vt.global_cursor_default=0, which will tell the Linux kernel to not display any cursor on the framebuffer console.
So, to add those options, we simply modify board/stmicroelectronics/stm32mp157-dk/overlay/boot/extlinux/extlinux.confin Buildroot as follows:
label stm32mp15-buildroot
  kernel /boot/zImage
  devicetree /boot/stm32mp157c-dk2.dtb
  append root=/dev/mmcblk0p4 rootwait console=ttySTM0,115200 vt.global_cursor_default=0
Of course, rebuild the SD card image with make, reflash and test the result on your STM32MP1 platform.


